Well, we finally poured our slabs on grade and front steps - in Nov. and Dec. We decided to place snow melt heating loops in the slabs, and it does seem a bit extravagant, but if we actually use it, it means no application of salt to melt ice, and clean, safe entries to the building, especially for the front steps. As we plan to eliminate the gas service, there will not be any strong heat source to service these snow melt areas -unless we use a wood boiler!
So the idea is to simply run the wood boiler at times when we are expecting significant snow and we need to clear ice from the front steps. In working out the heat inputs and hydronic flow rates for glycol, etc, I realized a big lesson for exterior snow melt applications. Normally, radiant slabs are assumed to benefit from high thermal mass - that is when they are indoors, one wants a constant temperature, and heavy massive slabs help to regulate and temper any significant fluctuations such as high solar loads, etc. Thus, the hydronic heating pipes are frequently installed submerged in slabs of concrete or gypcrete, etc. However, snow melt works in reverse, in a sense. In a snow melt application, one wants LOW thermal mass to avoid heating up a big, massive concrete slab just to melt off a thin layer of snow or ice. Doing the calculations, one finds that it is actually easy to spend more energy bringing the slab to temperature than melting the snow or ice, even when the slab is insulated underneath. Wish I knew this before I did mine, but for all you guys and gals out there thinking of snow melt, consider this. Unfortunately, I don't know of any practical solutions to this whole issue at this time, though I have some ideas - we must keep the slab as thin as possible, insulate well underneath, and insulate the edges as well, if practical. The idea I have been toying with is using a stainless steel or steel plate as the top surface of the slab - or even building the top of the 'slab with a series of rectangular stainless steel tubes and run the heating fluid through these. This would place the fluid in nearly direct contact with the snow/ice, and diminish heat transfer to the concrete. The plate would need to have a traction surface, which is an issue because I don't like diamond plate (there is a company 'Algrip' making beautifully dimpled surfaces via laser deposition of metal - no idea of price). And stainless steel is very cheap right now - just about twice the price of steel. But it does seem extravagant....
On another note, snow melt components are priced into the thin air of the mountains. Companies such as Uponor and Viega make the snow sensors, and they are absolutely ridiculous - I cannot understand why. An ABS plastic housing that holds the sensor (needed during rough-in/casting of the slab) which should cost maybe $20 (perhaps for lack of volume in production), instead commands some $150 in the plumbing/mechanical supply store. See pic;
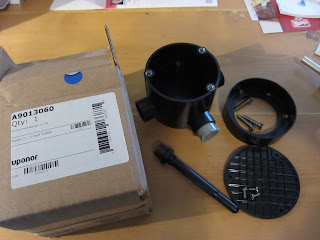 |
| This little kit of parts is $150 (contractor price). The black plastic disc/cover is discarded when the snow melt sensor is installed. The tube-like thing is made of steel and the temperature sensor is to go into that tube, which sits inside the slab. The sensor itself is about $1000 contractor price (retail is $1700). |
The sensor is just a couple of plates of brass separated by a space. The resistance between these plates is reduced in the presence of snow and this change triggers a signal which becomes the snow melt system's demand for heat. Very simple, but the darn sensor is about $1000. I say it's worth $50 at most. Since we are no longer at the beginning of the project and money is getting more expensive, we opted to make our own plastic housing and later, when the house is finished and there is more time, we will make our own snow sensor, if needed. After all, a manual system is not much of an issue - in any case, it is often desirable to heat the slab well before snow appears.
 |
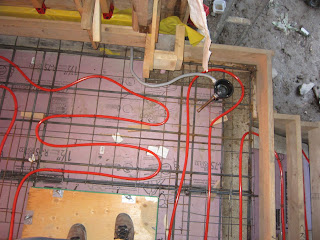
| Look closely and you'll see we placed some pipe insulation around the pex tubing where it enters the building. This is to cushion the tubing in case the slab moves relative to the building. We also agonized over where to enter the building. In the end we opted to drill through the wall inside the slab volume, but we drilled the hole with a significant slope so any water from rain or snow will find it harder to flow into the building through those holes. |
 |
| Add caption |
Here is our rough-in:
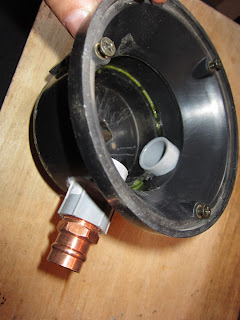 |
DIY Rough-in for snow melt sensor made from common plumbing parts - 4" clean-out - we would have to make an adaptor plate to adapt the actual sensor to this bolt pattern, or make our own sensor, which is more likely.
Below are some photos of our snow-melt piping installation. BTW, I mentioned this to a contractor and he told me they never install 1/2" pex for snow melt - they use 5/8" minimum. I double-checked my calculations and feel very comfortable with the 1/2" pex - but we'll see if it performs when the time comes. He is probably thinking of larger areas like driveways. In our case, it is only on three little concrete slabs.
|


